README file from
GithubHexmap World Creator
An Obsidian plugin for tabletop RPG hex-map world-building. Each hex on the map is a Markdown note in your vault — attach terrain, locations, paths, and prose directly to the geography of your world.
What it does
Hexmaker gives you an interactive hex grid that lives inside Obsidian. Paint terrain, draw roads and rivers, link town and dungeon notes to individual hexes, overlay faction and geographic region fills, roll random encounters, and browse everything in a spreadsheet view — all without leaving your vault. Every hex is a plain Markdown file you own.
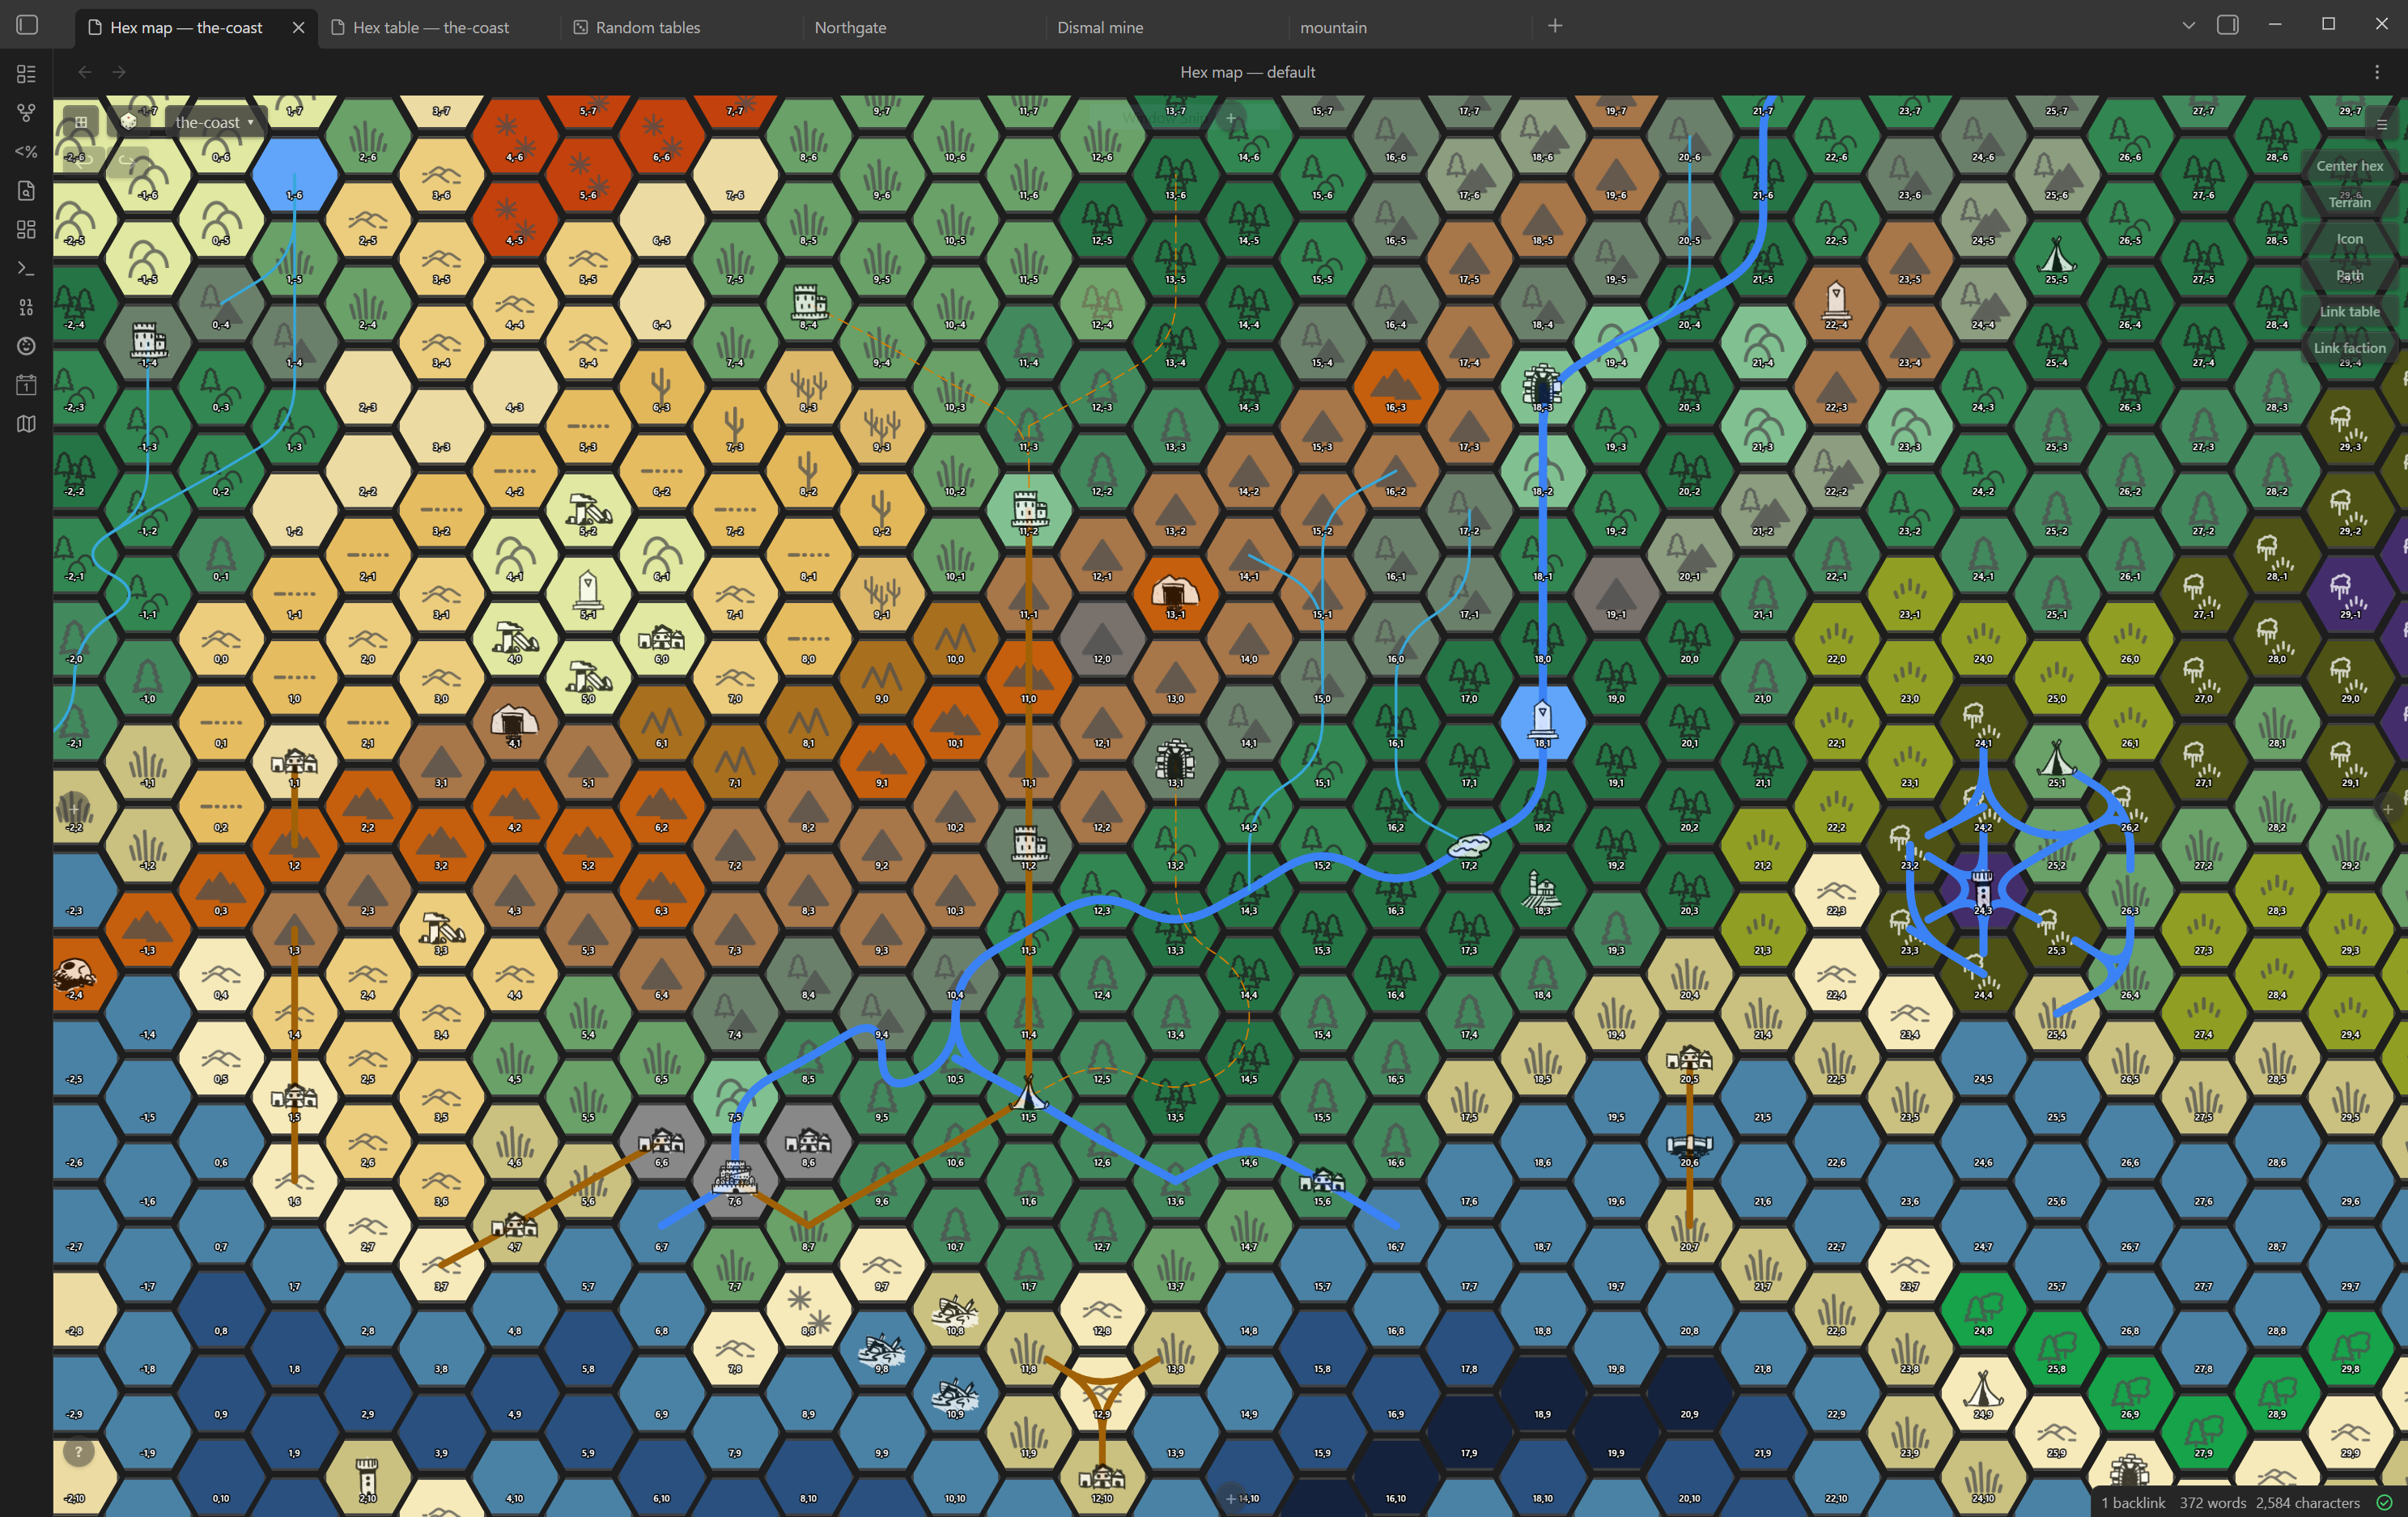
Hex editor
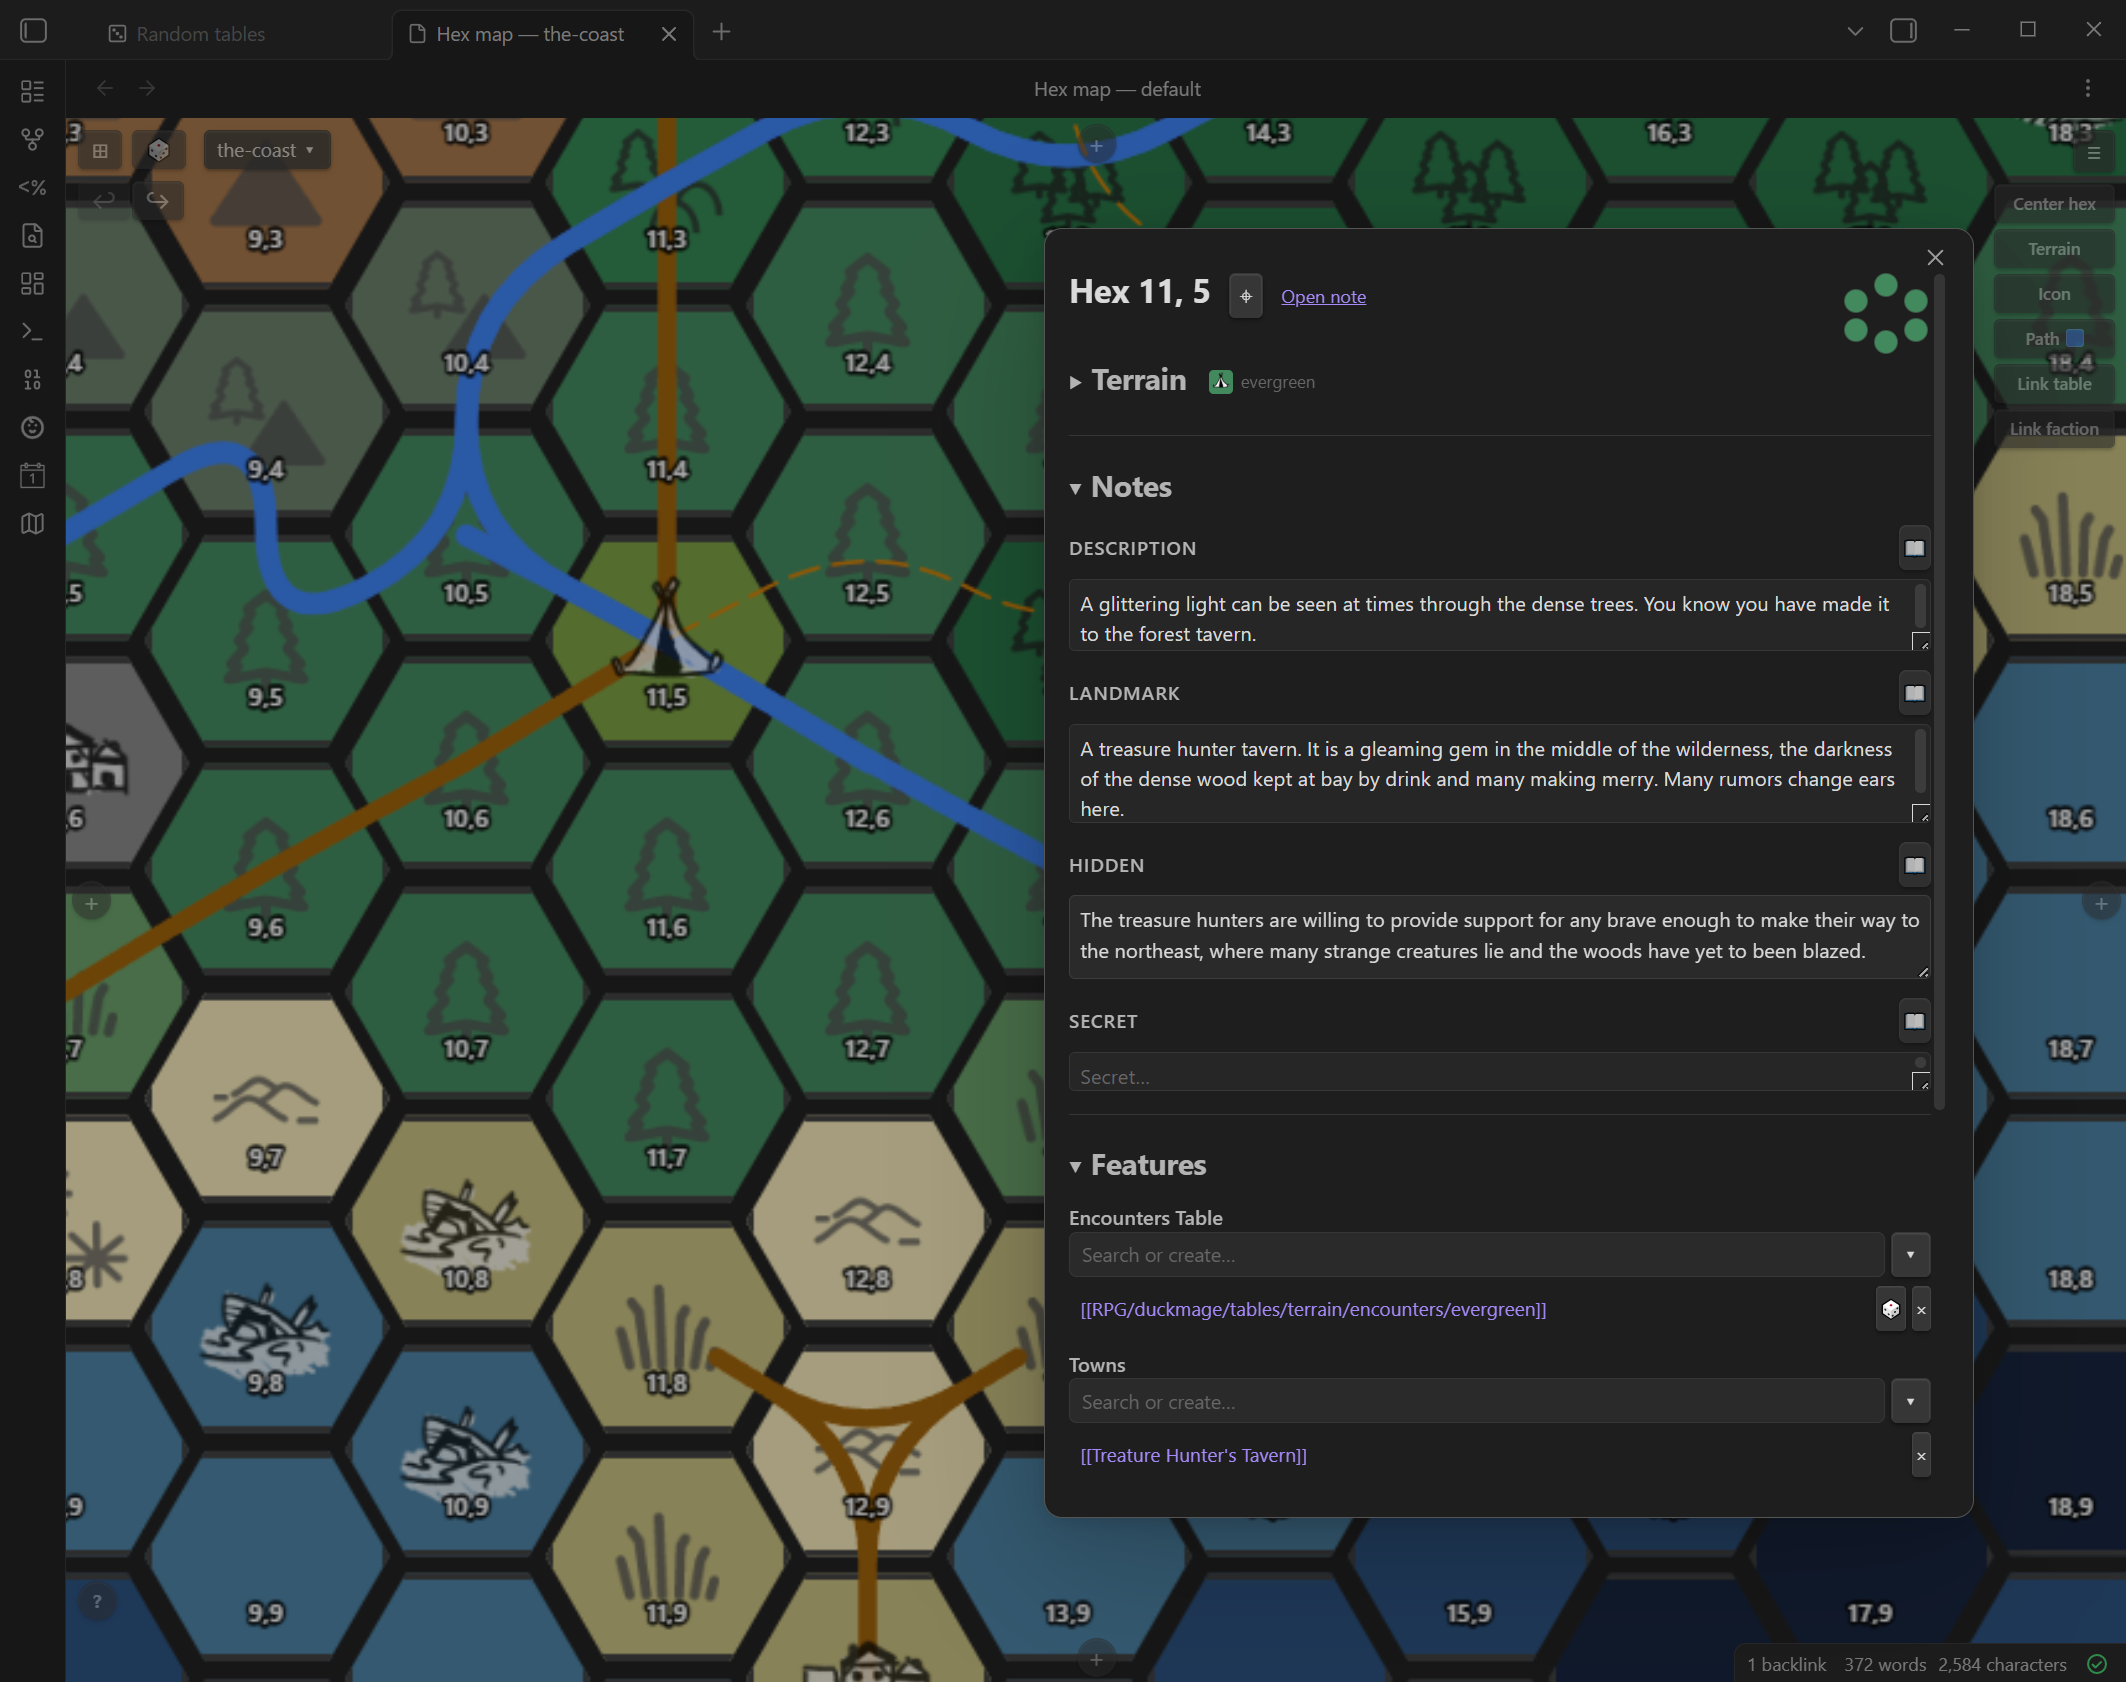
Right-click any hex to open the editor: set terrain, override the icon, link Towns, Dungeons, Features, Quests, Factions, and Encounters Tables, and write freeform notes (Description, Landmark, Hidden, Secret, Weather, Hooks & Rumors). A 🎲 button on each section lets you roll any random table and append the result inline.
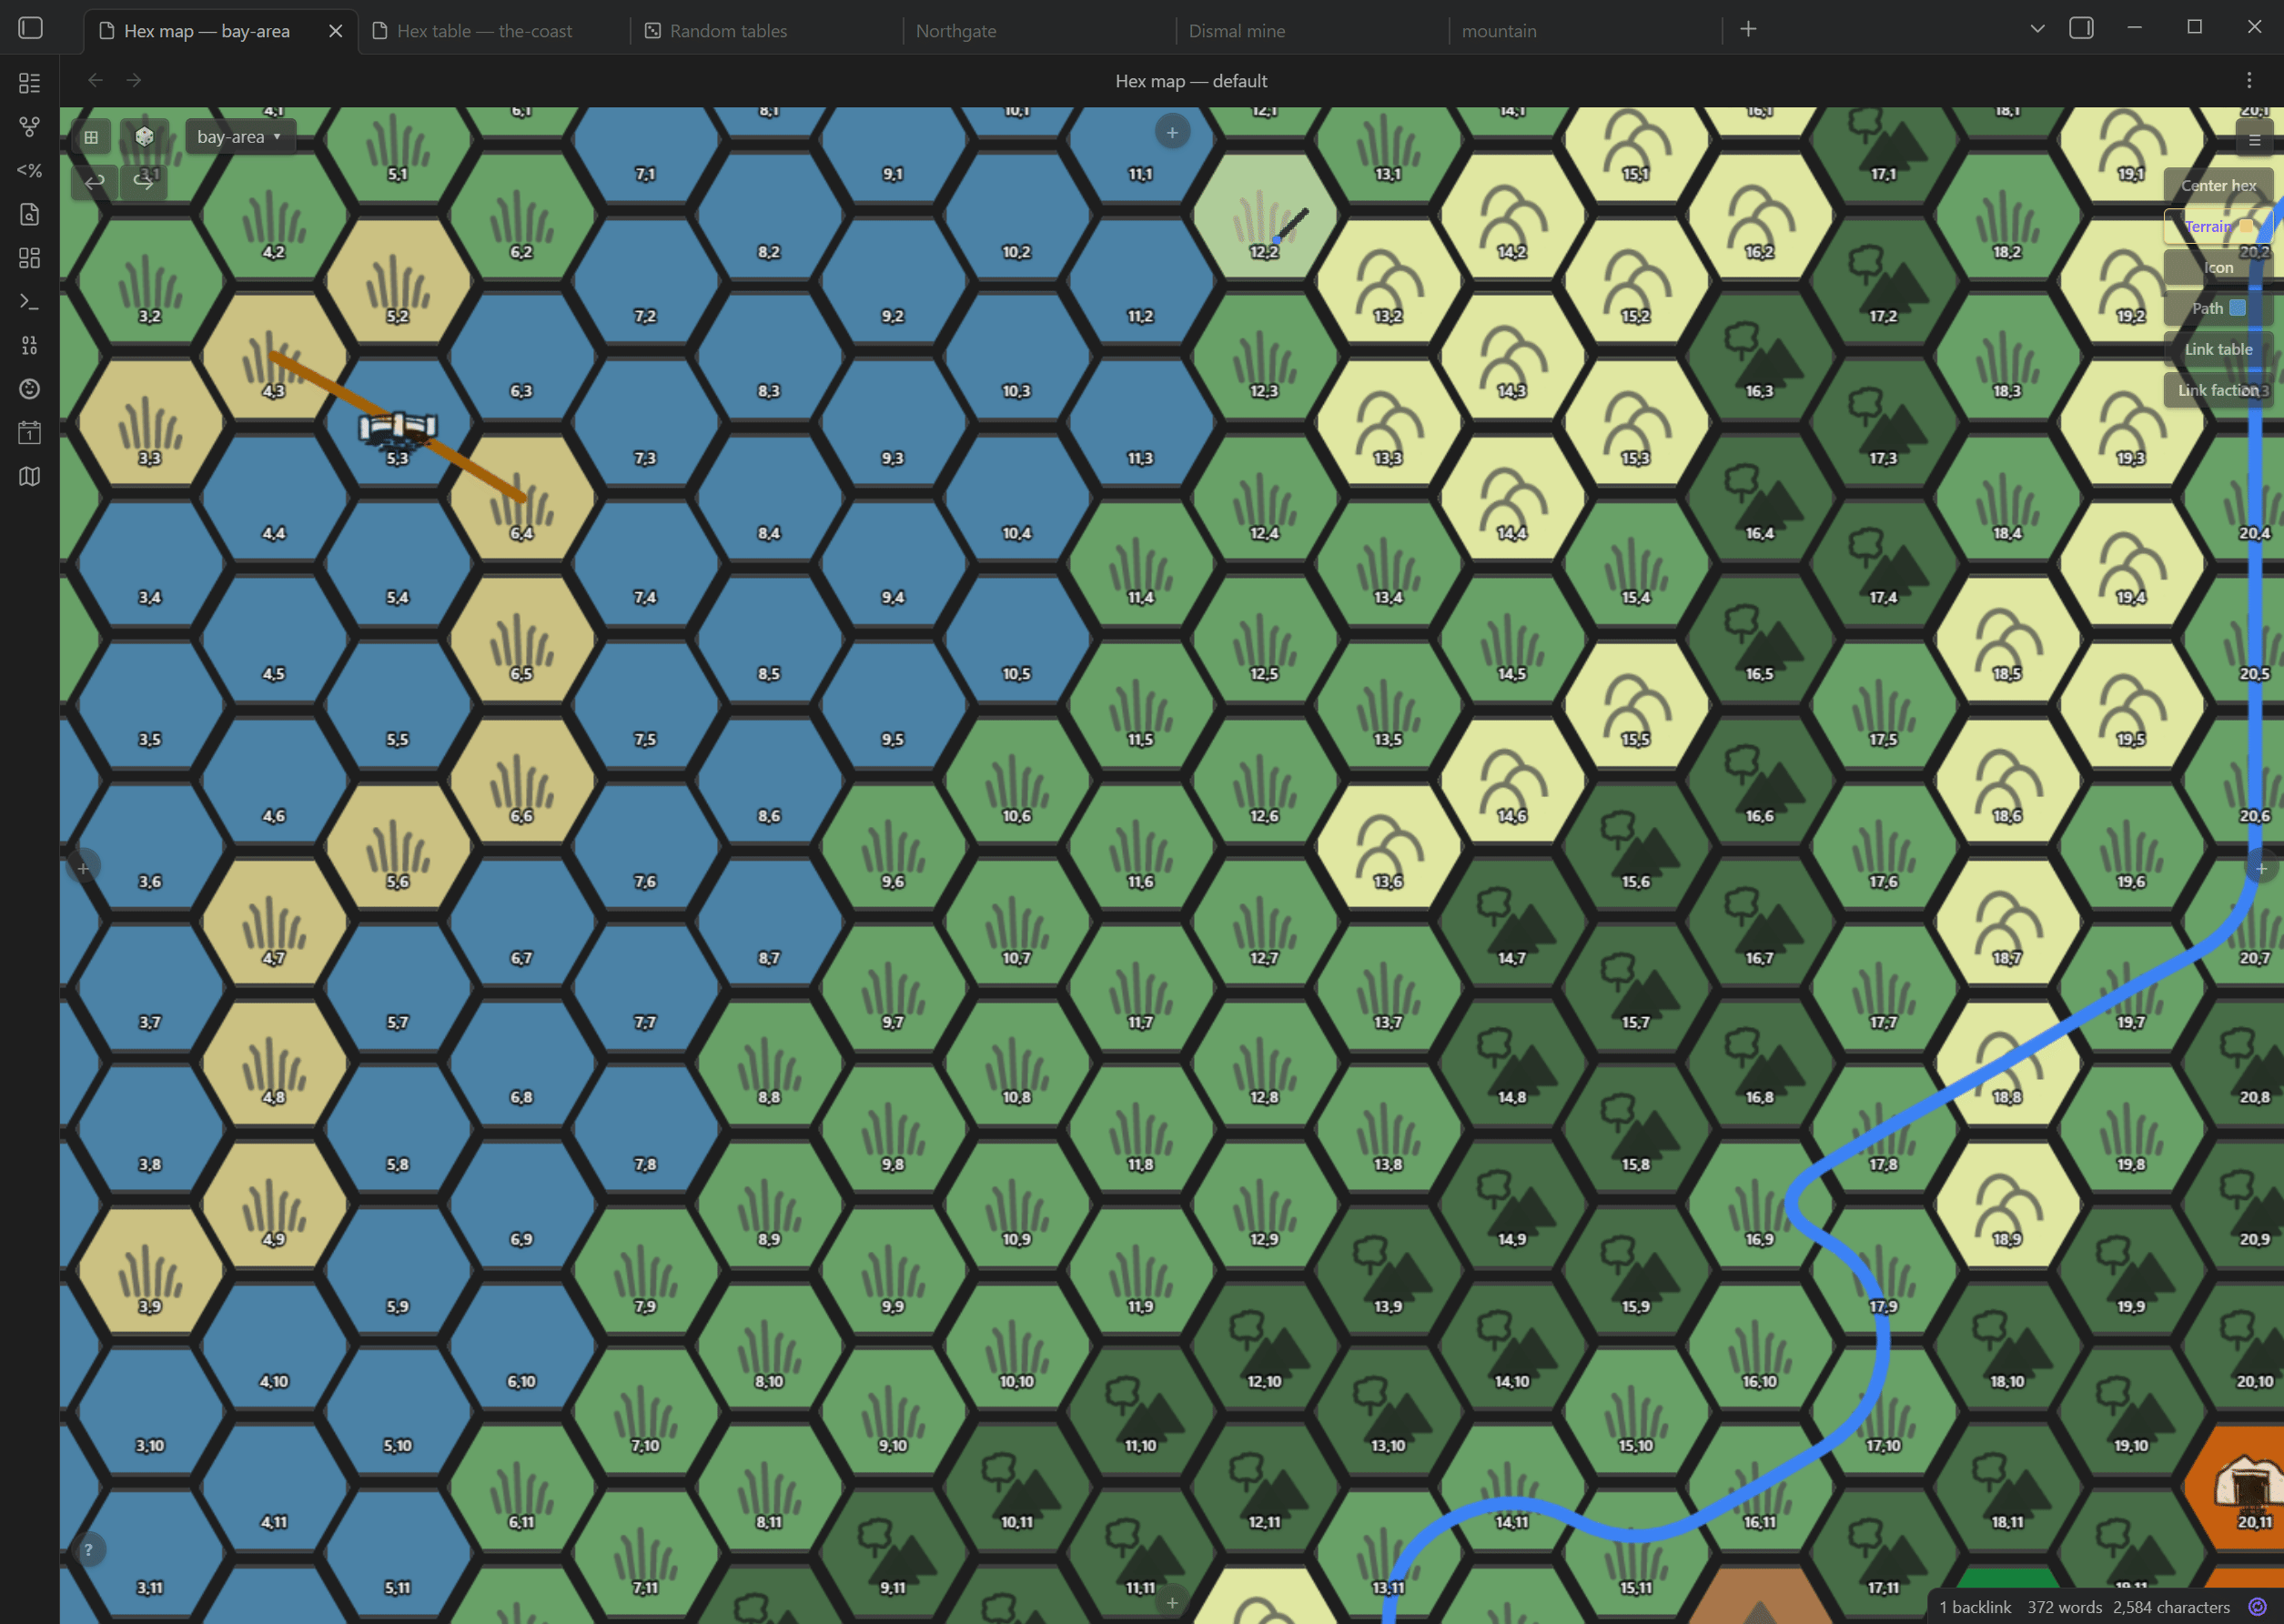
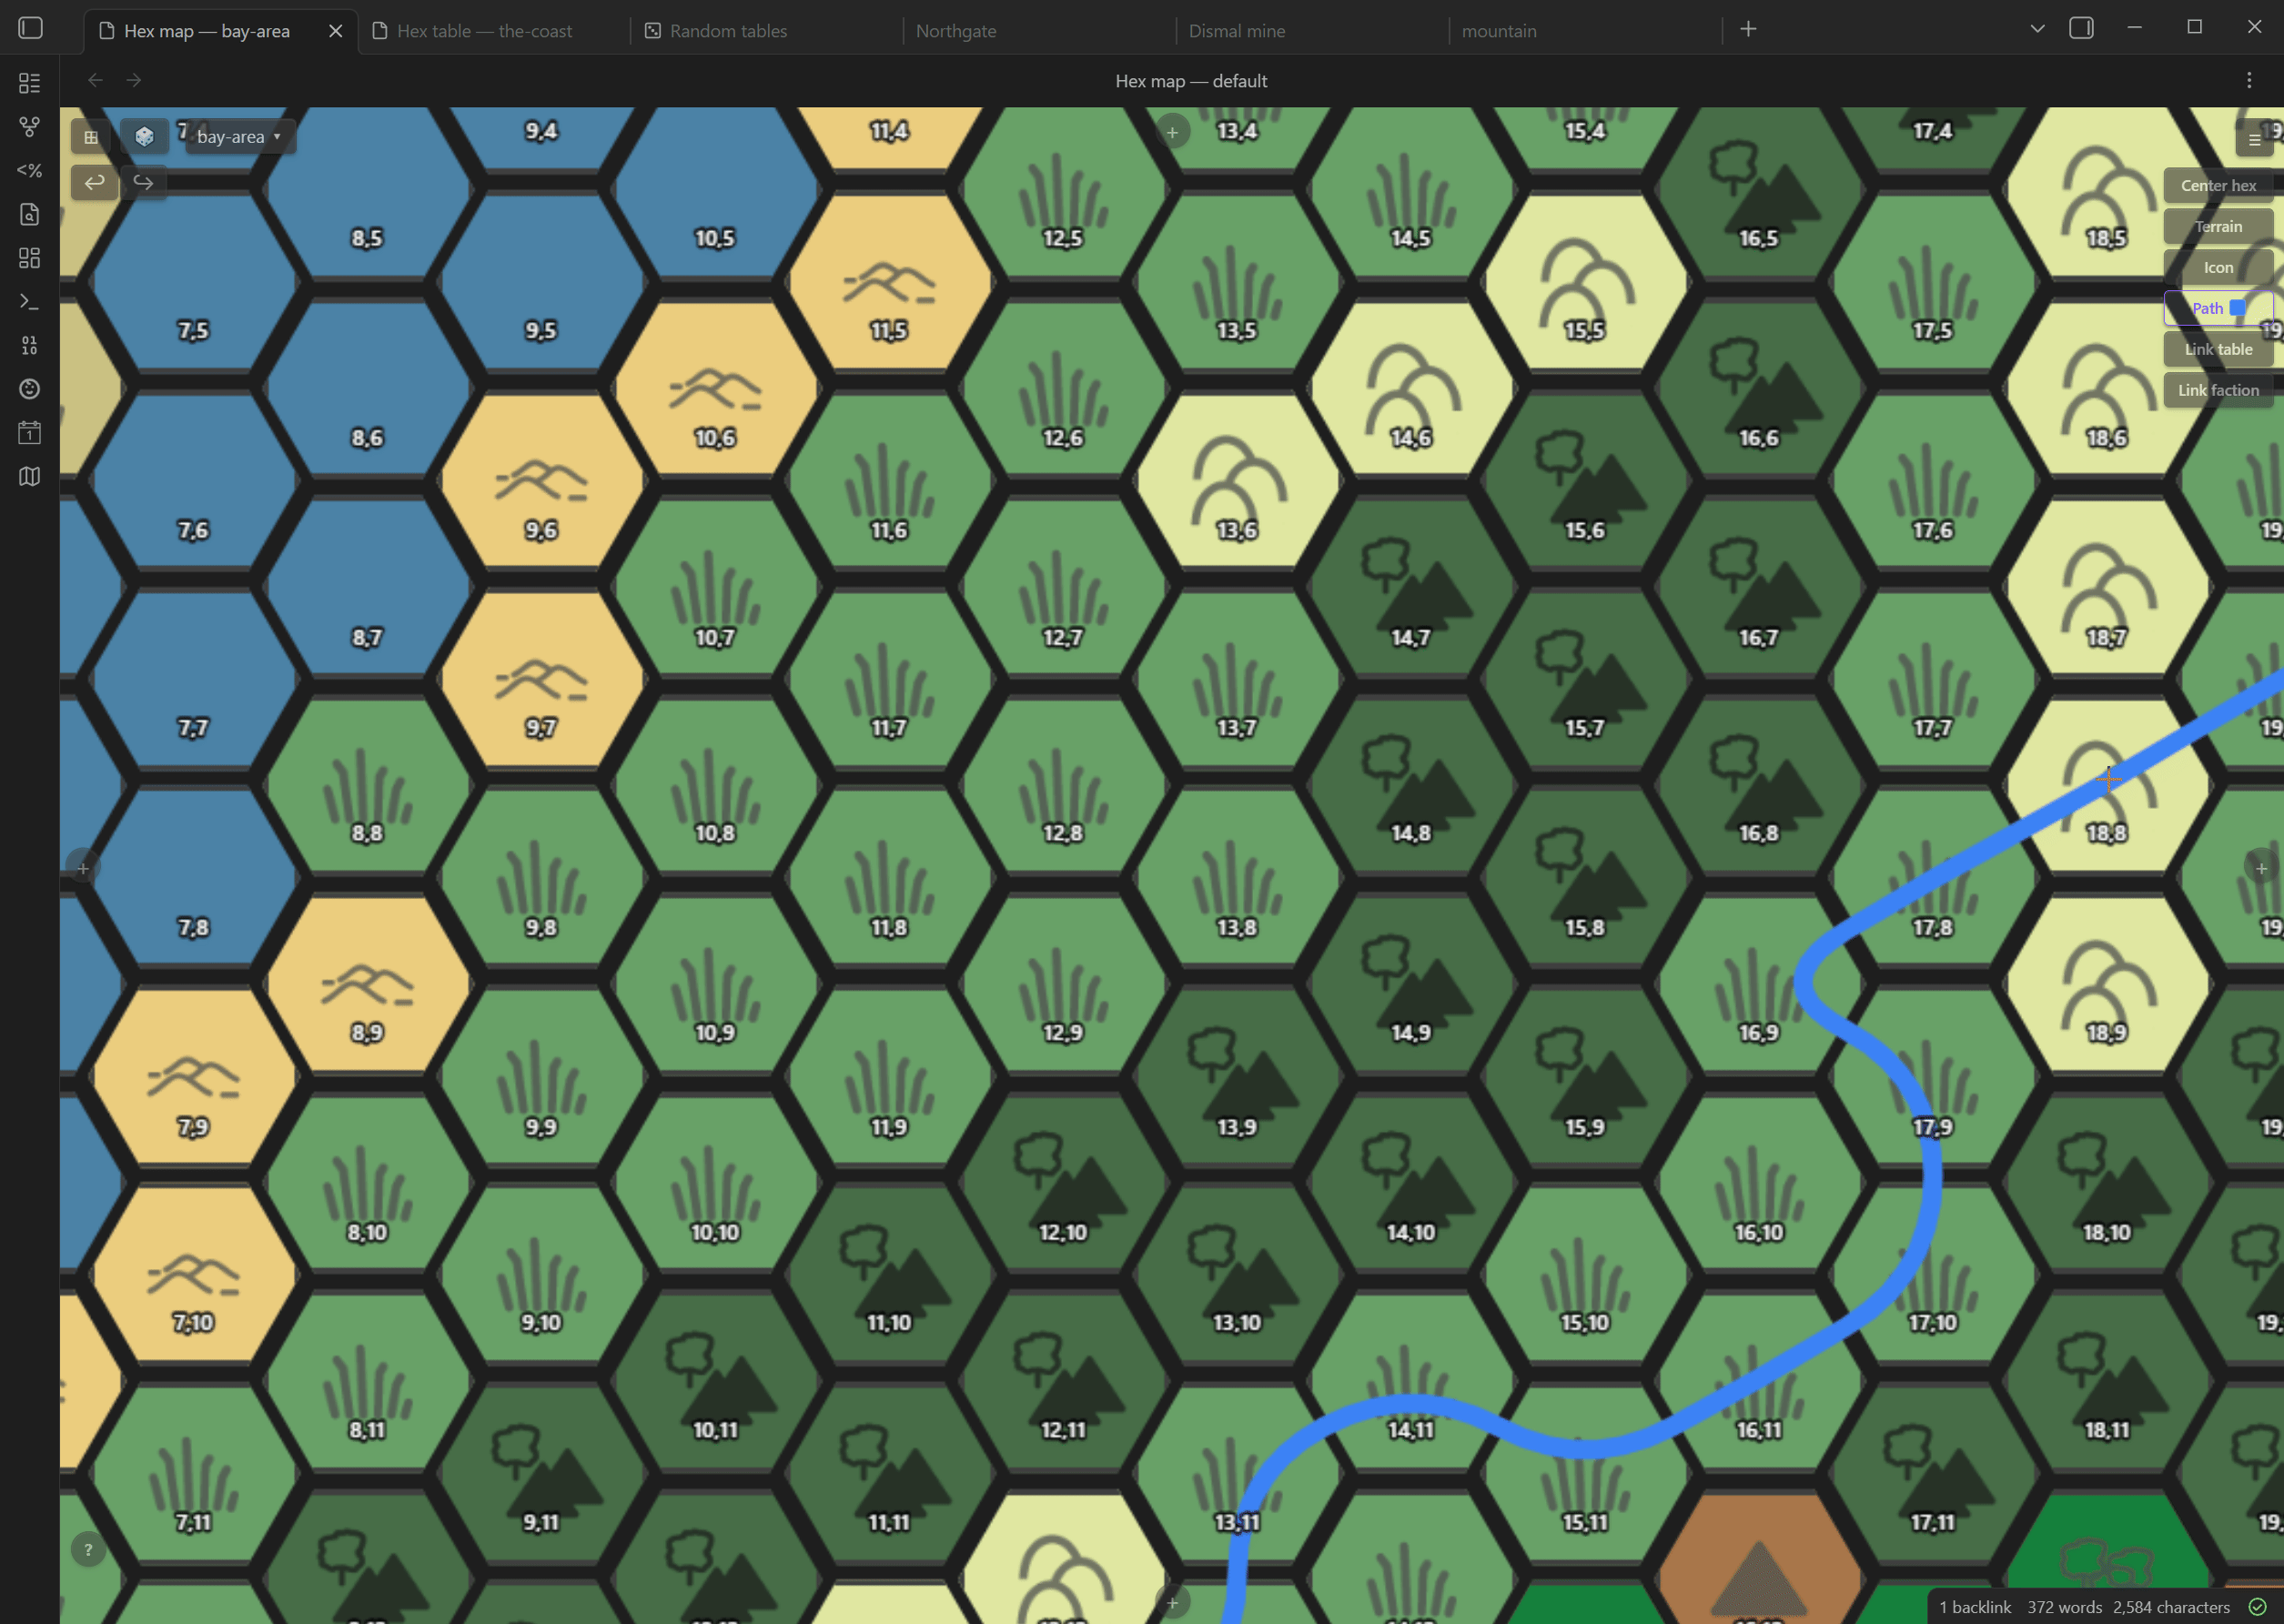
Terrain painting
Switch to the Terrain tool, pick a colour from your palette, and drag across hexes to paint. Choose a 1×, 3×, or 7× brush for broad strokes. An eyedropper lets you sample an existing hex's terrain as your active brush.
Path drawing
Click the Path button to open the path picker. Select any defined path type — road, river, or anything you've created — then click hexes to lay down a chain. Each type has its own colour, width, line style (solid / dashed / dotted), and routing mode (through hex centres, meandering between them, or tracing hex edges). Edit types at any time from the map toolbar.
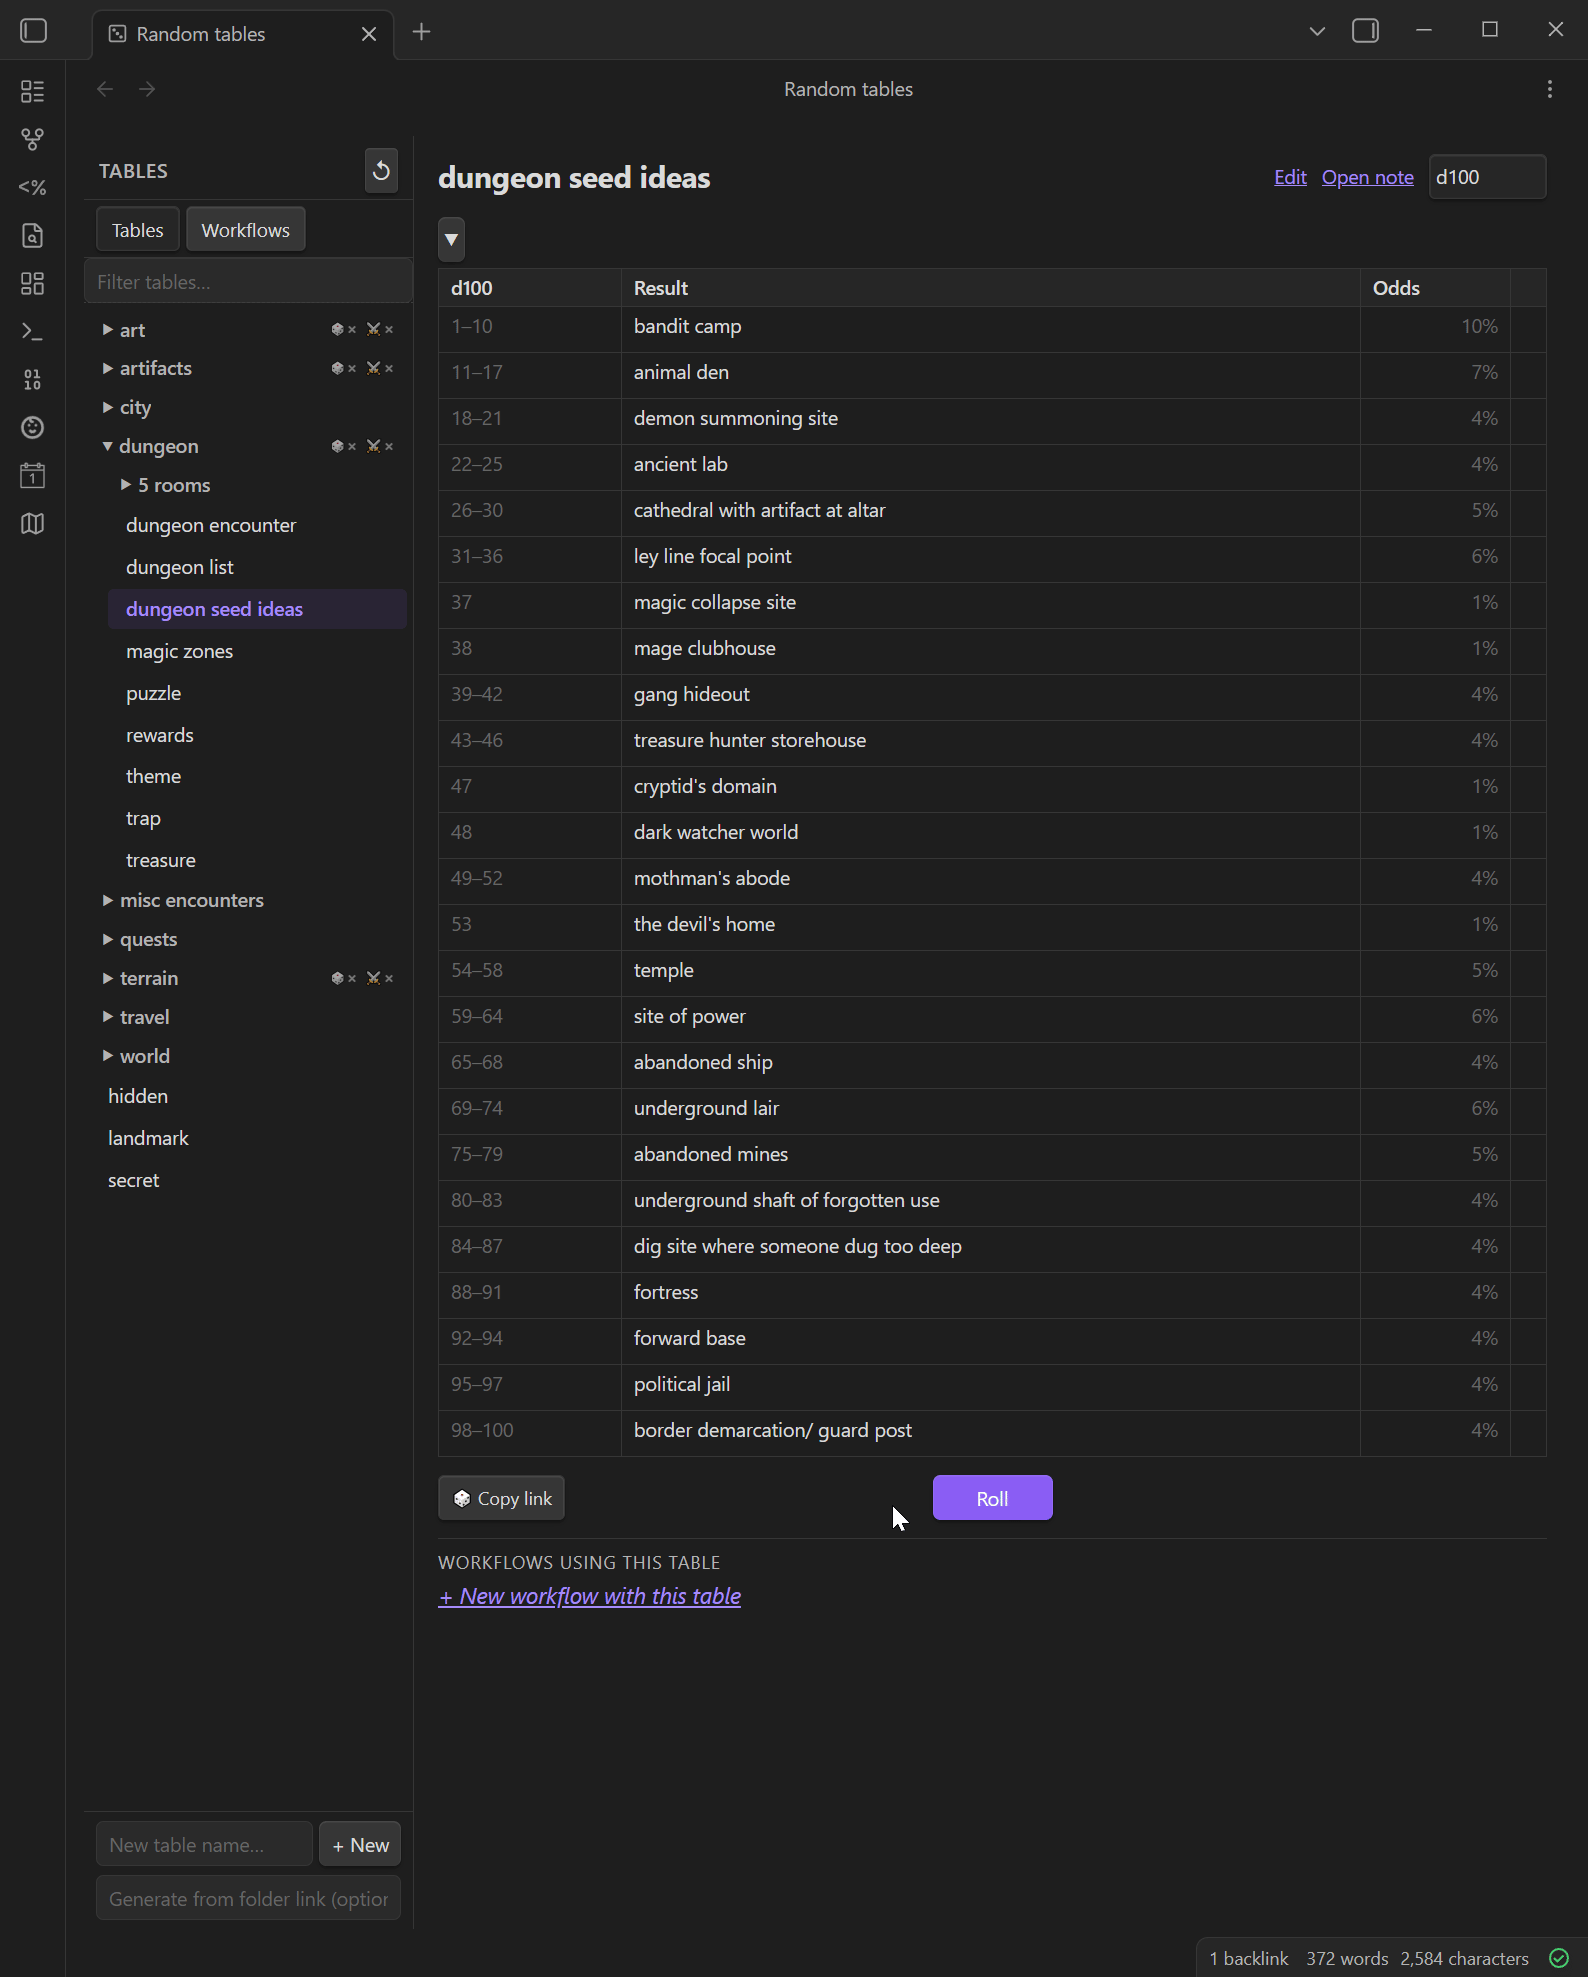
Random tables
A two-panel view for rolling and managing weighted random tables. Click any table to open it, hit Roll to highlight a result, and see percentage odds for every entry. Create new table files from the toolbar, edit entries inline, and chain tables together into multi-step workflows that fill a template note with rolled results.
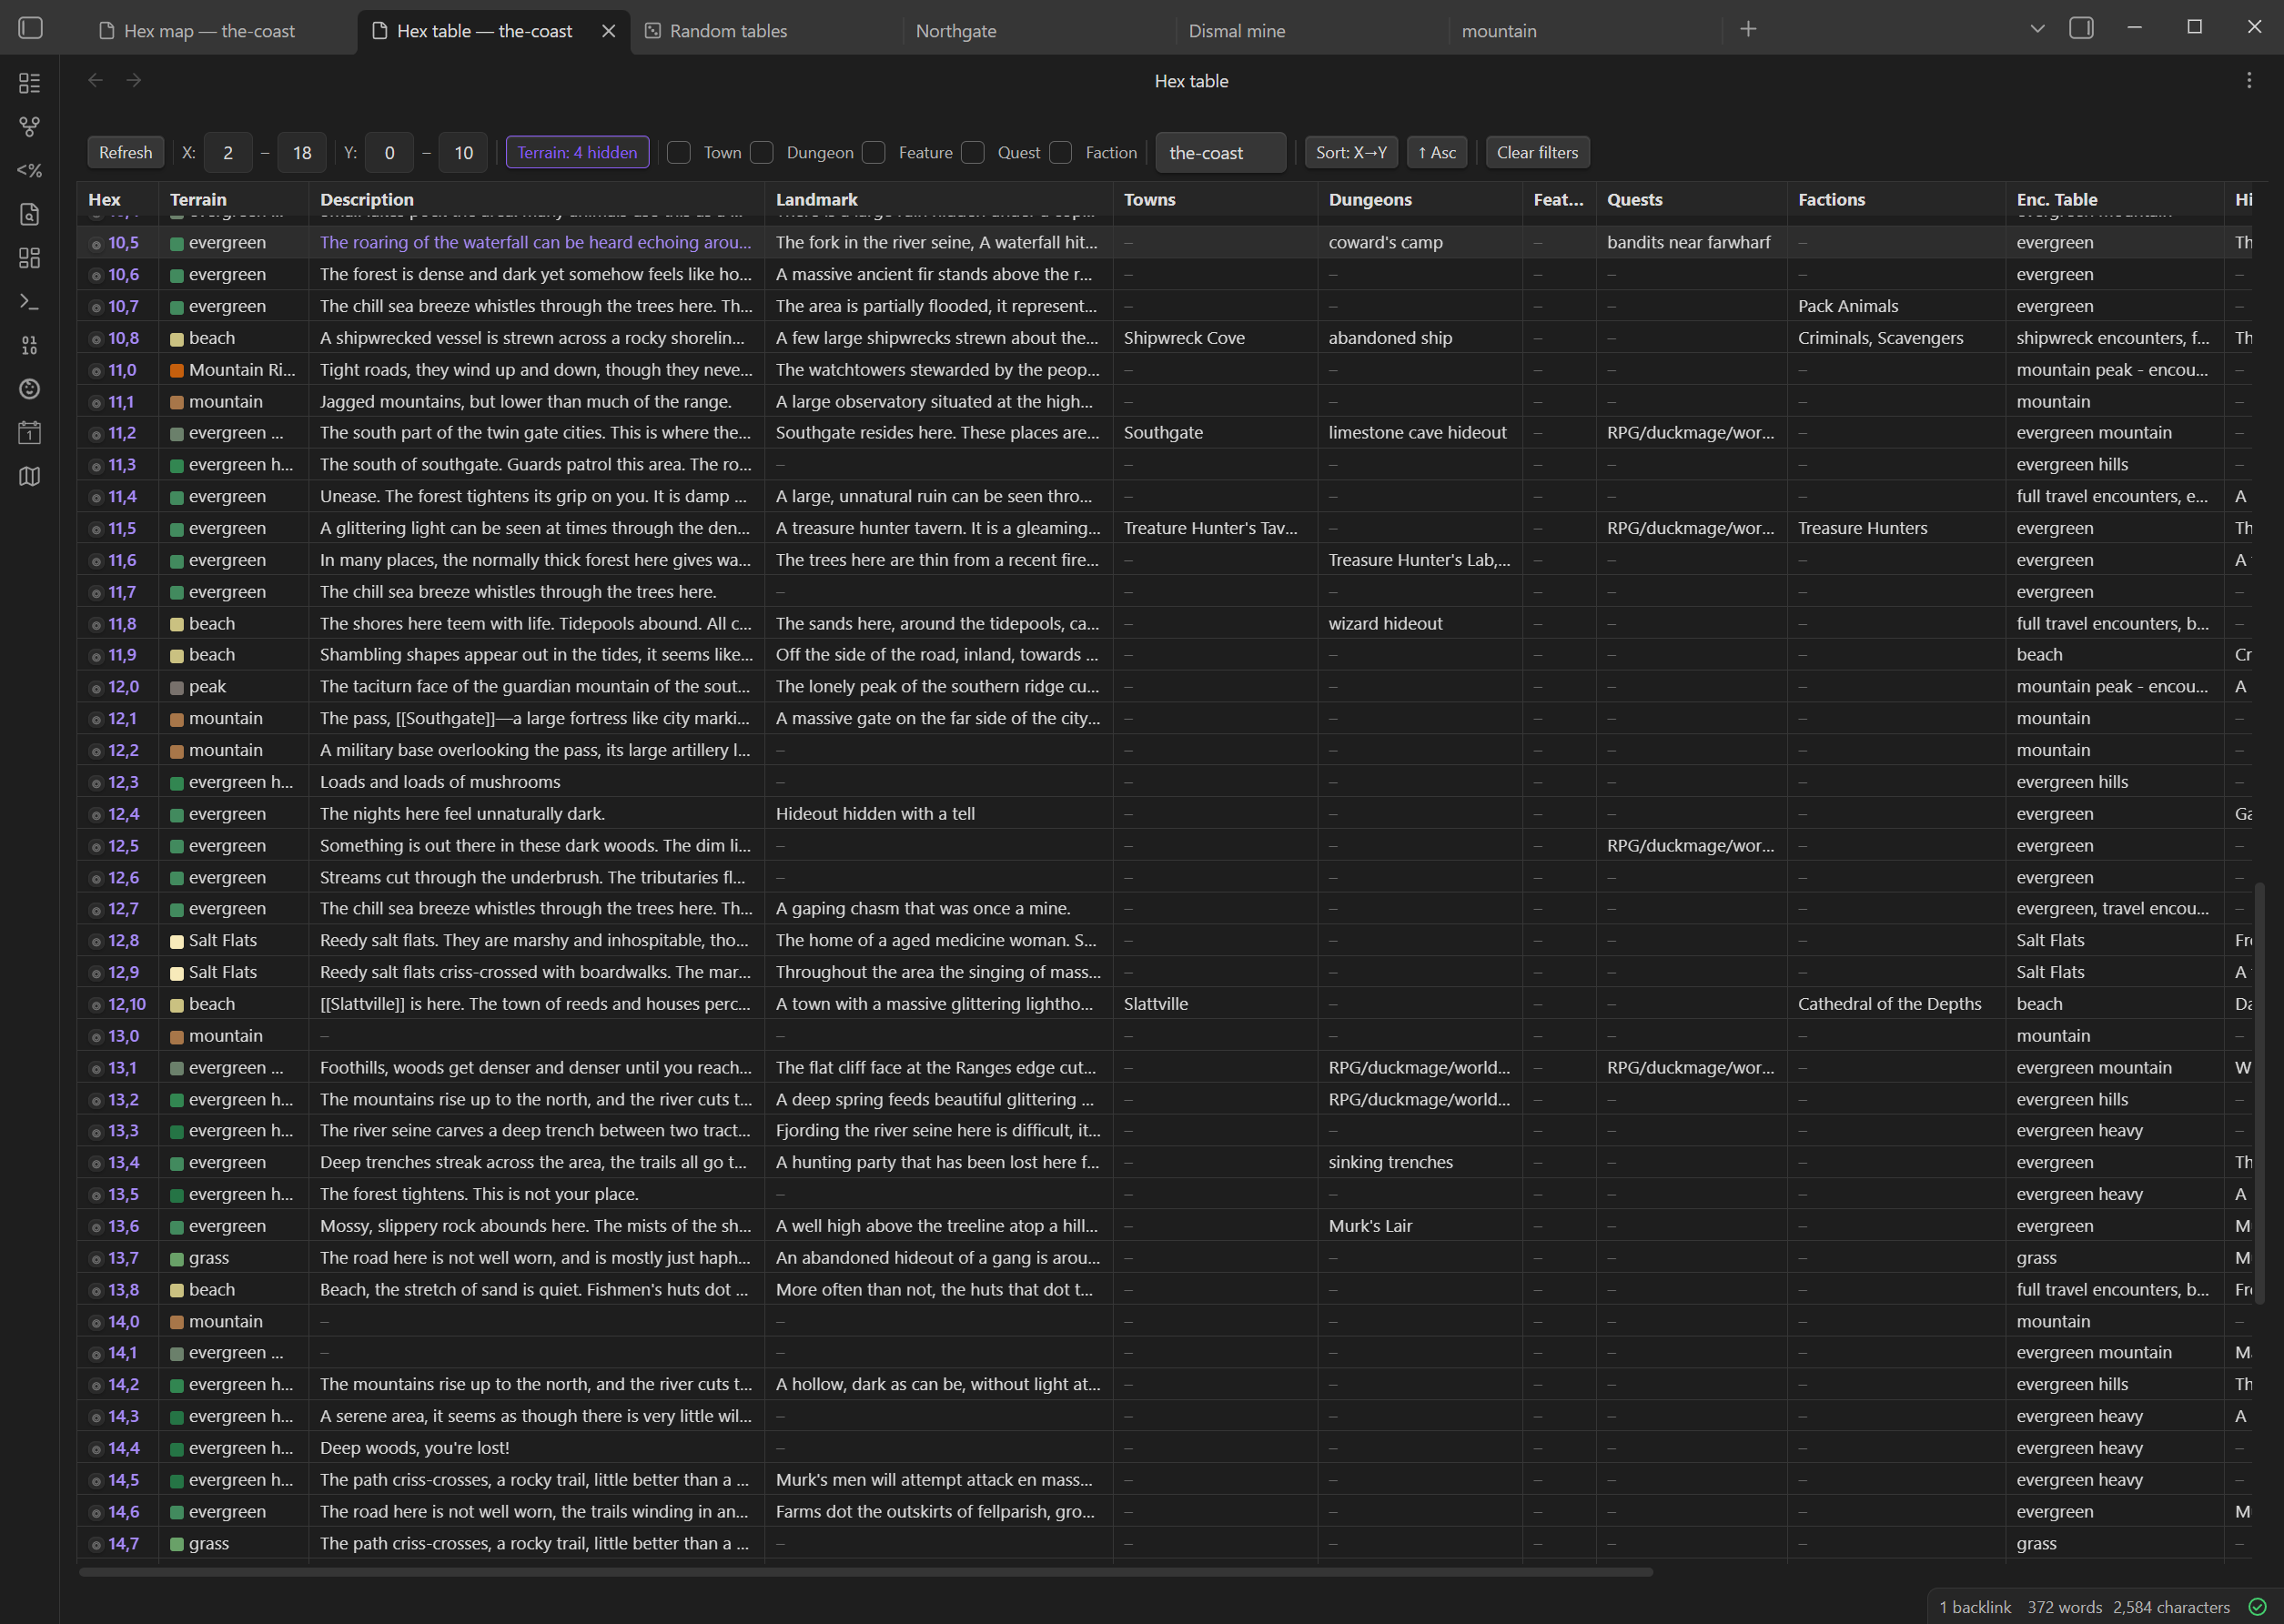
Hex table view
A scrollable spreadsheet of every hex note — one row per hex, columns for terrain, description, towns, dungeons, features, quests, factions, encounters table, and all the freeform sections. Click any cell to edit it in place. Filter by region, terrain type, or the presence of specific link types. The ◎ button jumps the map view to that hex's position.
Faction and region overlays
Paint translucent colour fills over hexes to show political control or geographic regions. Adjacent hexes of the same faction or region merge into smooth blobs with a rendered legend. Toggle overlays from the map toolbar; overlay state is saved per map.
GM layer
Toggle the GM layer from the toolbar to switch between player-facing and GM views. When active, Hidden and Secret sections in the hex editor expand automatically, and hexes with hidden or secret content are highlighted on the map.
Manual Installation
- Download
main.js,manifest.json, andstyles.cssfrom the latest release. - In your vault, create the folder
.obsidian/plugins/hexmaker-plugin/. - Copy the three downloaded files into that folder.
- In Obsidian, open Settings → Community plugins, find Hexmaker in the list, and enable it.
Getting started
After enabling the plugin, do this once before you start mapping:
1. Set your world folder
Open Settings → Hexmaker and enter a root folder name in World folder (e.g. RPG/world). This is the base for all other folders.
2. Generate folders
Click Generate folders. This fills in the hex, towns, dungeons, tables, and other folder settings with sensible defaults under your world folder and creates them in your vault. Any field you've already filled in is left untouched.
3. Open the Hex Map
Click the map icon in the left ribbon (or use the command palette: Open Hexmaker hex map). You'll be prompted to create your first region — give it a name, choose its size, and pick a terrain palette.
4. Generate terrain tables
Once your folders are set, go back to Settings → Hexmaker and click Generate terrain tables & hex links. This creates a description and encounters table file for every terrain type and links them into any existing hex notes. It's safe to run again at any time.
You're ready to start mapping.
Features
Hex Map view
An interactive hex grid rendered as an Obsidian panel.
- Left-click a hex to open (or create) its note.
- Right-click a hex to open the hex editor.
- Pan by clicking and dragging with the left or middle mouse button.
- Zoom with the scroll wheel.
- Expand the grid with the
+/−buttons in the toolbar. - Go to hex (
⌖button) — enter coordinates to centre the view on a specific hex.
Regions
The map is divided into named regions, each stored as a subfolder under your hex folder. Switch, create, rename, and delete regions from the region button in the toolbar.
Each region is assigned a terrain palette at creation time (see below).
Hex editor (right-click menu)
A side-panel modal for editing a hex note without leaving the map.
- Terrain picker — select the terrain type for the hex from the region's palette.
- Icon override — override the default terrain icon with any icon in your icons folder.
- Towns / Dungeons / Features / Quests / Factions — link existing notes from their configured folders, or create a new note by name. Linked items are clickable and open in a new tab. Each entry has a remove button.
- Encounters Table — link random table files to a hex. Clicking a linked table opens the Random Tables view with that table pre-selected.
- Notes sections — Description, Landmark, Hidden, Secret, Weather, Hooks & Rumors — inline text areas with a 🎲 roll button to append a result from any random table.
- Open note link next to the hex coordinates opens the full note in a new tab.
Random Tables view
Open via Command palette → "Open Hexmaker random tables" or the 🎲 toolbar button on the hex map.
A two-panel view for managing and rolling on random tables.
- Left panel — lists all
.mdfiles in the configured Tables folder. Click a table to load it. + New creates a file from the default template. - Right panel — shows the table's entries with odds (percentage or die range). Roll button highlights the winning row and shows the result. The result is editable before use. Roll history shows the last 5 results.
- Change die dropdown — updates the
dice:frontmatter and recalculates die ranges.
Workflows view
Open via the Workflows tab in the Random Tables panel.
Chain multiple table rolls together into a filled template note.
- Create a workflow — define steps (each step rolls a table N times), a template with
$placeholdervariables, and a results folder. - Roll a workflow — each step shows a dropdown and a Roll button. The template fills in live as you roll. Save the result as a new vault note.
Terrain tables & hex linking
Each terrain type has two auto-generated table files: {terrain} - description.md and {terrain} - encounters.md, stored under {tablesFolder}/terrain/.
⚠️ Configure all folder settings before clicking Generate. The Generate button (Settings → Hexmaker → Generate world data) creates the terrain table files and links each hex note's terrain encounters table into its Encounters Table section. It is safe to run multiple times.
Drawing tools (toolbar)
Toggle tools from the toolbar above the map. Right-click off a hex to exit any tool.
| Tool | Left-click | Right-click (on hex) |
|---|---|---|
| Terrain | Paint terrain on a hex (drag to paint multiple) | — |
| Icon | Paint an icon override on a hex | — |
| Path | Add hex to the active path chain | Remove hex from chain |
| Faction | Paint a faction colour on a hex (drag to paint multiple) | Erase faction from hex |
| Region | Paint a geographic region colour on a hex | Erase region from hex |
| Table link | Add the selected random table as a link in a hex's Encounters Table section | — |
Terrain painter extras:
- Clicking the Terrain button always reopens the palette so you can switch colours mid-session.
- Pick (eyedropper) — samples the terrain from the next hex you click and sets it as the active brush.
- Clear — paints the "no terrain" state.
- Brush size — paint 1×, 3×, or 7× hex radius at once.
Path tool: Click the Path button to open the path type picker. Select a type to start drawing, or switch to edit mode to create, rename, recolour, or delete path types. Each path type has a name, colour, line width, line style (solid / dashed / dotted), and routing mode:
- Through — smooth Bezier curve through hex centres.
- Meander — gentle curve through the midpoints between hex centres (good for rivers).
- Edge — traces strictly along the hex polygon boundary lines between hexes.
Overlays (faction and region)
Toggled from the overlay panel on the map toolbar.
- Faction overlay — paint a faction colour on any hex. Adjacent hexes of the same faction merge into smooth filled blobs with a coloured border. A legend lists each active faction. Edit faction names and colours from the overlay panel. Faction data is stored as wiki-links in each hex note's
### Factionssection. - Region overlay — paint a geographic region colour on any hex. Regions render as filled blobs with a scaled label centred on the blob. Region data is stored in each hex note's frontmatter.
- Both overlays can be shown simultaneously and toggled independently.
GM layer
Toggle the GM layer from the map toolbar. When active:
- Hexes with Hidden or Secret content are visually highlighted.
- The hex editor automatically expands the Hidden and Secret sections when opened.
GM layer state is stored per map and persists across sessions.
Hex table view
Open via Command palette → "Open Hexmaker hex table".
A scrollable reference table of every hex note, with one row per hex and columns for all sections.
- Coordinates column — click to open the hex note.
- Terrain column — click to open the terrain picker.
- Town / Dungeon columns — click an empty cell to add a link (pick existing or create new); click a populated cell to open the note (or a navigation list for multiple links).
- Text section columns (Description, Landmark, etc.) — click any cell (including empty ones) to open an inline editor. Saves directly to the section in the hex note, creating the note and section if they don't exist yet.
- Resize columns by dragging the border between column headers.
- Refresh button reloads all data from disk.
Settings
Open Settings → Hexmaker to configure:
| Setting | Description |
|---|---|
| World folder | Root folder for world notes (used by the Features file picker). |
| Hex folder | Folder where hex notes are stored, e.g. RPG/world/hexes. |
| Towns folder | Scopes the Towns dropdown to a specific folder. |
| Dungeons folder | Scopes the Dungeons dropdown to a specific folder. |
| Quests folder | Scopes the Quests dropdown to a specific folder. |
| Factions folder | Scopes the Factions dropdown to a specific folder. |
| Tables folder | Folder for random table files. Terrain tables are created in a terrain/ subfolder here. |
| Workflows folder | Folder for workflow definition files and their templates. |
| Default die | Die size used when creating new table files (d4–d100). |
| Icons folder | Folder containing .png icon files available as custom terrain/hex icons. |
| Template path | Path to a custom hex note template. Supports {{x}}, {{y}}, {{title}} placeholders. Leave blank to use the built-in template. |
| Hex gap | Gap between hexes in pixels. |
| Grid size | Number of columns and rows in the map grid. |
| Hex orientation | flat (default) or pointy top hex style. |
| Path types | Named path types used by the Path drawing tool. Each type has a name, colour, width, line style, and routing mode. Manage them from the Path button on the hex map toolbar. |
| Terrain palettes | Named palettes of terrain types. Each palette has a name and a list of terrain entries (name, colour, optional icon). Palettes are assigned to regions at creation time and cannot be changed after. Edit palette contents from the terrain tool on the hex map. |
| Generate | ⚠️ Configure all folders first. Creates missing terrain table files and links each hex's terrain encounters table into the hex note. |
Hex notes
Each hex note lives at {hexFolder}/{region}/{x}_{y}.md (e.g. RPG/world/hexes/Overworld/3_7.md).
Frontmatter:
---
terrain: Forest
---
Sections (used by the editor and table view):
| Heading | Type | Purpose |
|---|---|---|
### description |
Text | What the party sees and feels |
### landmark |
Text | The standout visible feature |
### Towns |
Links | Settlement links |
### Dungeons |
Links | Dungeon/site links |
### Features |
Links | Other points of interest |
### Quests |
Links | Active quest links |
### Factions |
Links | Faction links (used by the faction overlay) |
### Encounters Table |
Links | Random table links (linked to terrain by Generate) |
### hidden |
Text | Discoverable with effort |
### secret |
Text | Revealed only through investigation |
### weather |
Text | Weather notes |
### hooks & rumors |
Text | Adventure seeds |
You can use your own template (configured in Settings). Any ### Heading that matches a section name will be picked up automatically.
Development
npm install        # install dependencies
npm run dev        # watch mode — rebuilds main.js on every save
npm run build      # production build (type-check + bundle)
npm run version    # bump version (updates manifest.json and versions.json)
npm test           # run the test suite
The built output is main.js in the repo root. Obsidian loads this file directly from the plugin folder.
Reload the plugin after a build:
// Paste in Obsidian developer console (Ctrl+Shift+I)
app.plugins.disablePlugin('hexmaker-plugin');
app.plugins.enablePlugin('hexmaker-plugin');
Source layout
main.ts                          ← re-exports HexmakerPlugin
src/
  HexmakerPlugin.ts              ← plugin entry point
  HexmakerSettingTab.ts          ← settings UI
  HexmakerModal.ts               ← base modal class (all modals extend this)
  types.ts                       ← interfaces and type constants
  constants.ts                   ← runtime constants and defaults
  frontmatter.ts                 ← terrain/icon YAML read/write
  sections.ts                    ← markdown section read/write helpers
  utils.ts                       ← shared utilities
  defaultHexTemplate.md          ← built-in hex note template
  hex-map/
    HexMapView.ts                ← interactive hex grid (ItemView)
    HexEditorModal.ts            ← right-click hex editor (Modal)
    TerrainPickerModal.ts        ← terrain palette picker
    TerrainEntryEditorModal.ts   ← edit a single terrain entry
    IconPickerModal.ts           ← icon override picker
    RegionModal.ts               ← region management
    PathPickerModal.ts           ← path type picker
    PathTypeEditorModal.ts       ← edit a single path type
    FileLinkSuggestModal.ts      ← file picker scoped to a folder
  hex-table/
    HexTableView.ts              ← hex reference table (ItemView)
    HexCellModal.ts              ← inline cell editor
    HexTerrainPickerModal.ts     ← terrain picker in table view
  random-tables/
    RandomTableView.ts           ← random tables + workflows panel (ItemView)
    RandomTableModal.ts          ← inline roll modal
    RandomTableEditorModal.ts    ← edit table entries
    WorkflowEditorModal.ts       ← edit workflow definition
    WorkflowWizardModal.ts       ← execute a workflow
    randomTable.ts               ← parse/roll/odds utilities
    workflow.ts                  ← workflow parse/serialize utilities
Troubleshooting
- "Failed to load plugin" —
main.jsis missing. Runnpm run build. - Viewing logs — Press
Ctrl+Shift+I(Windows/Linux) orCmd+Option+I(Mac) to open the developer console.
Third-party libraries
This plugin bundles MiniSearch (© Luca Ongaro, MIT License) for in-memory full-text search.