
README file from
GithubSnapshot Diff
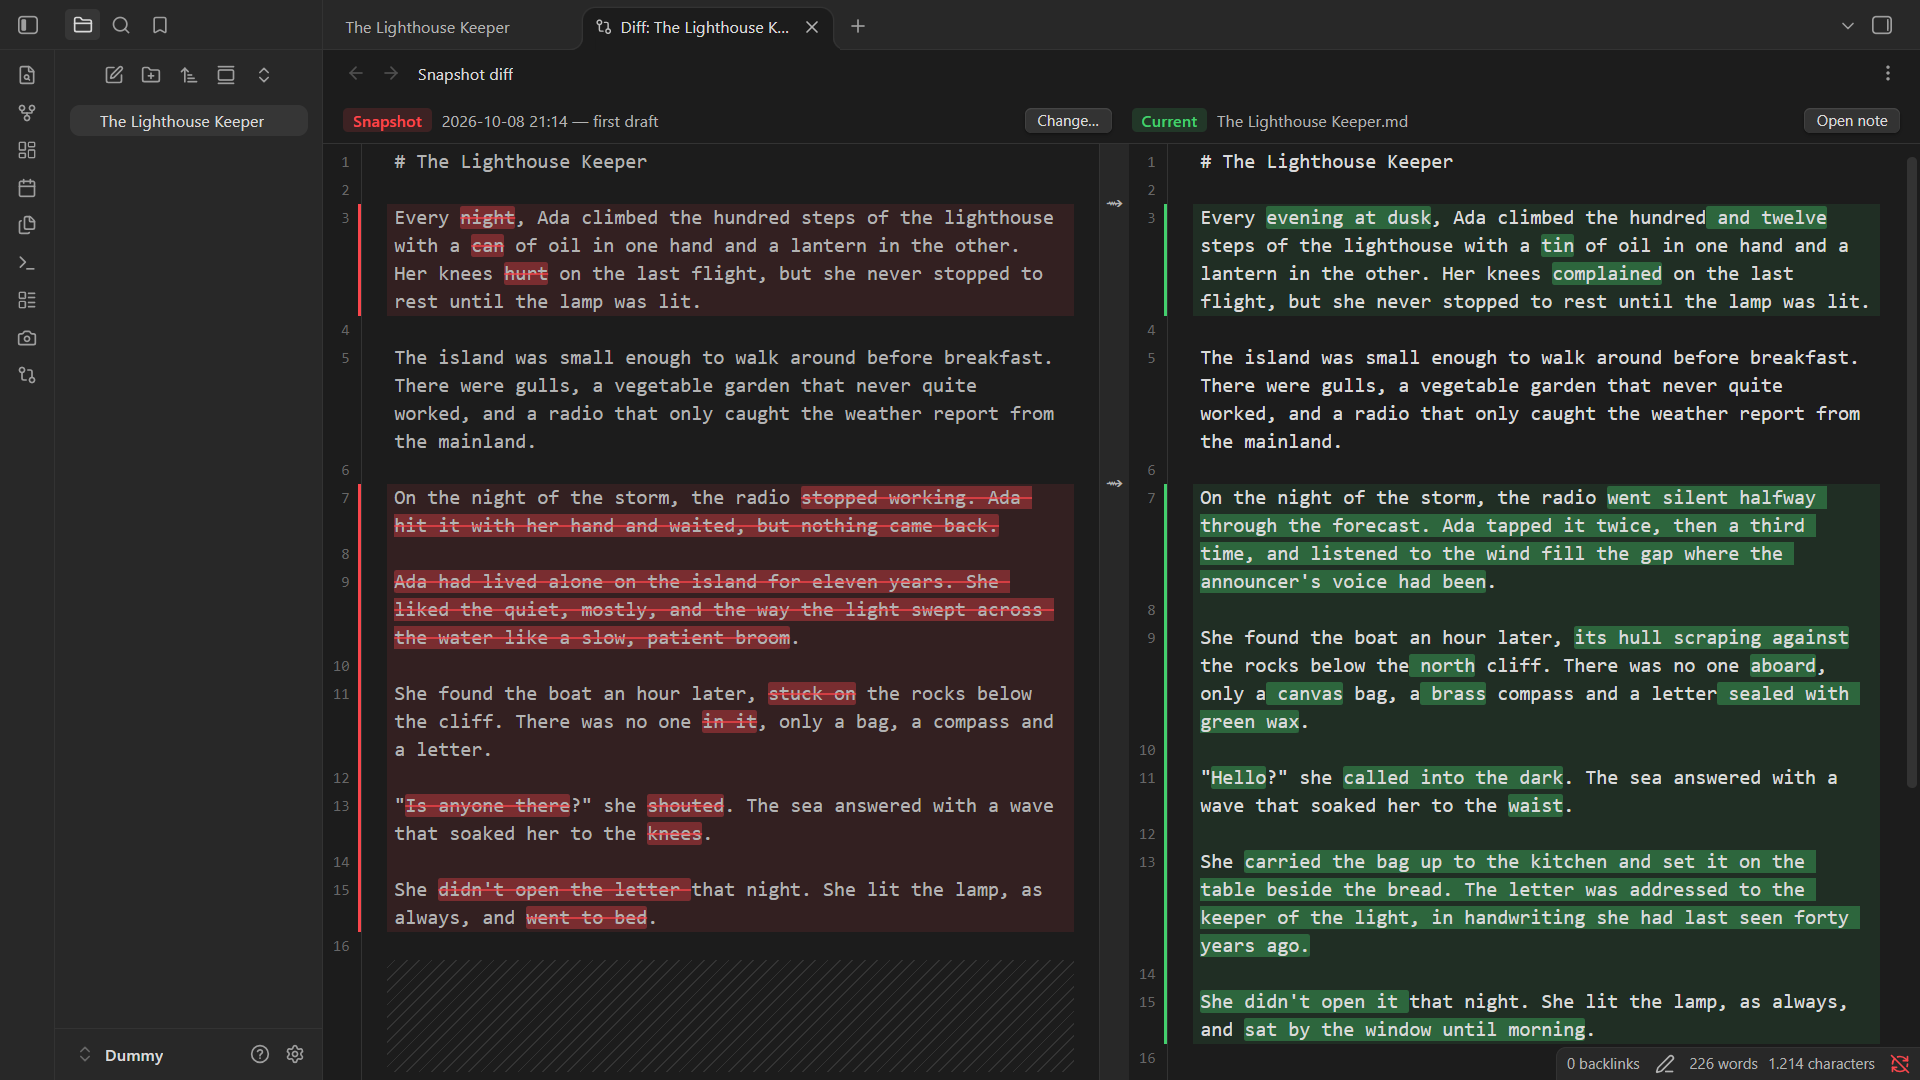
Take a snapshot of a note in one click, then compare any earlier version of it side by side with the live note: the whole file on both sides, with the changes highlighted word by word.
Features
- Instant snapshots. One command or ribbon click saves the note as it is now, with an optional name ("before rewriting the ending"). Snapshots are plain Markdown files and follow the note when you rename or move it.
- Every earlier version in one picker. Choose from:
- your snapshots;
- the automatic versions Obsidian's core File recovery plugin saves every few minutes;
- the git commits that changed the note, if your vault is a git repository (desktop only).
- Full side-by-side diff. The earlier version is on the left, the live note on the right, both shown in full, with changes highlighted by whole words so rewritten sentences stay readable. Both sides have line numbers, and the space added to keep paragraphs aligned is hatched, so it's never mistaken for blank lines.
- Edit while you compare. The right side is your actual note and saves as you type. The left side is read-only, but you can select and copy from it.
- Restore a block in one click. The arrows between the panes copy a changed block from the earlier version back into your note.
Usage
| Command | What it does |
|---|---|
| Take snapshot | Saves the current note immediately, with a timestamp. |
| Take named snapshot | Same, but asks for a name first. |
| Compare with previous version… | Opens the picker: the 5 latest snapshots, the 5 latest File recovery versions and the 5 latest git commits for the note. When there are more snapshots or File recovery versions, a Show all… row lists every one. |
| Compare with latest snapshot | Opens the diff with the newest snapshot, skipping the picker. |
| Delete a snapshot… | Moves a snapshot to the trash. |
The camera and compare icons in the ribbon, and the right-click menu on a note, offer the same actions. You can bind hotkeys to any command in Settings → Hotkeys. Inside a diff tab, Change… switches to another version and Open note opens the note in a regular tab.
Settings
| Setting | Default | |
|---|---|---|
| Snapshot folder | .snapshots |
Where snapshots are stored. A folder starting with a dot is hidden from the file explorer, search and graph. Changing it doesn't move existing snapshots. |
| Ask for a name on every snapshot | Off | When off, Take snapshot saves instantly; Take named snapshot always asks. |
| Maximum snapshots per note | 5 | When a new snapshot goes over the limit, that note's oldest snapshots are deleted. Set to 0 for no limit. |
| Collapse unchanged sections | Off | Fold long unchanged stretches in the diff. |
| Show restore arrows | On | Show the arrows that copy a block back into the note. |
| Open the diff where you were reading | On | Scroll a new diff to the line that was at the top of the note, instead of the start of the file. |
You can change the snapshot limit to whatever suits you. High limits aren't recommended, especially in large vaults: every snapshot is a full copy of its note.
Where snapshots are stored
Each snapshot is a Markdown file named after the note, the date and the time
(plus your name for it, if you gave one), for example
.snapshots/Chapters/Chapter 6/Chapter 6 2026-10-05_14-30-12.md. It survives
restarts and you can open it with any tool. When you rename or move a note,
its snapshots move with it, and renaming also updates their file names.
Snapshots deleted with Delete a snapshot… go to your system trash (or the
vault's .trash folder). Snapshots removed by the per-note limit are deleted
permanently.
If your vault is a git repository, add the snapshot folder to its .gitignore:
.snapshots/
Privacy and permissions
- No network access and no telemetry. Nothing leaves your device.
- Git (desktop only). To list commits, the plugin runs your installed
gitin the vault folder with read-only commands (git logandgit show). It never commits, checks out or changes anything in the repository. If git isn't installed, or the vault isn't in a repository, commits don't appear. On mobile, git is never used. - File recovery. Obsidian has no public API for File recovery versions, so the plugin reads them the way Obsidian's own File recovery screen does. If a future Obsidian update changes that, these versions stop appearing in the picker and everything else keeps working. File recovery must be turned on in Settings → Core plugins. Its versions are tied to the note's path, so versions saved before a rename don't appear.
Installation
From Obsidian: open Settings → Community plugins → Browse, search for "Snapshot Diff", install it and enable it.
Manually: download main.js, manifest.json and styles.css from the
latest release into
<vault>/.obsidian/plugins/snapshot-diff/, then enable Snapshot Diff in
Settings → Community plugins.
Development
npm install
npm run dev     # rebuild on every change
npm run build   # type-check and build for release
Both write the plugin to snapshot-diff/ (main.js, manifest.json,
styles.css). Copy or symlink that folder into a test vault's
.obsidian/plugins/ folder.
To release, run npm version patch (or minor, major). This updates
manifest.json and versions.json and creates the tag. Then
git push --follow-tags: a GitHub Actions workflow builds the plugin and drafts
a release with the three files for you to publish.
This plugin was developed with the help of Claude, Anthropic's AI assistant, used for writing and reviewing code and documentation. All changes were reviewed and tested by the author.