README file from
GithubDay Planner Enhanced
Day Planner Enhanced is a community plugin for Obsidian. It adds editable calendar views, basic time-tracking, and an enhanced timeline UI for readable nested schedules.
This plugin is an independent MIT-licensed fork of Obsidian Day Planner.
Day Planner Enhanced is integrated with
- The core Daily Notes plugin.
- the Tasks plugin
- Online calendars
Table of contents
- Table of contents
- Installation
- How to use it
- Upstream
- Acknowledgements
Installation
Day Planner Enhanced is listed in Obsidian's community plugin directory and can be installed from Obsidian's built-in community plugin browser.
Before installing, disable the original Day Planner plugin if it is already enabled in the same vault. This fork has its own plugin identity, but it still shares some Day Planner concepts, commands, and view behavior from the upstream codebase.
Install from Obsidian
This is the recommended way to install and update the plugin.
- Open Settings → Community plugins in Obsidian.
- Select Browse.
- Search for
Day Planner Enhanced. - Install and enable the plugin.
Manual installation fallback
-
Open the latest release.
-
Download these release assets:
main.jsmanifest.jsonstyles.css
-
Create the plugin folder in your vault:
<vault>/.obsidian/plugins/day-planner-enhanced/ -
Put
main.js,manifest.json, andstyles.cssdirectly inside that folder. -
Restart or reload Obsidian.
-
Enable
Day Planner Enhancedin Obsidian's community plugin settings.
Updating
- If you installed from Obsidian's community plugin browser, update through Obsidian's community plugin settings.
- If you installed manually, download the latest release assets and replace the existing files in the plugin folder.
- Restart or reload Obsidian after replacing plugin files.
How to use it
To open the timeline in the sidebar:
- Either run the command:
Show Timeline - Or click the timeline icon in the left ribbon
To open multi-day planner:
- Either run the command:
Show multi-day planner - Or click on the icon in the left ribbon:
You can overview the upcoming 3 hours in the mini-timeline in the status bar:
If there are remote tasks, the blocks will be colored accordingly.
The plugin can display records from different sources:
- Daily notes
- Obsidian-tasks
- Online calendars
- Dataview clock properties
Let's go over each one of them.
1. Showing events from your daily notes
[!Warning] Either the core 'Daily Notes' (core plugin) or the 'Periodic Notes' (community plugin, see in Obsidian) should be enabled. This is what allows day-planner to 'see' and interact with your daily notes.
Write your tasks in a daily note, and they show up on the timeline:
# Day planner

- [ ] 10:00 - 10:30 Wake up
- [ ] 11:00 - 12:30 Grab a brush and put a little make-up
2. tasks community plugin integration, showing events from other files in your vault
You can see tasks anywhere in the vault with dates added by the tasks community plugin. This also works out of the box for all the files in the vault. You only need to add the scheduled property to a task in one of the formats:
- Shorthand, added by tasks community plugin:
⏳ 2021-08-29- Note that this plugin has a handy modal for adding these properties
- Full Dataview-like property:
[scheduled:: 2021-08-29] - Another Dataview format:
(scheduled:: 2021-08-29).
For example, these tasks will show up in the timeline:
- [ ] #task 08:00 - 10:00 This task uses the shorthand format ⏳ 2021-08-29
- [ ] #task 11:00 - 13:00 This task uses the Dataview property format [scheduled:: 2021-08-29]
3. Showing internet calendars
To show events from internet calendars like Google Calendar, iCloud Calendar and Outlook you only need to add an ICS link in the plugin settings.
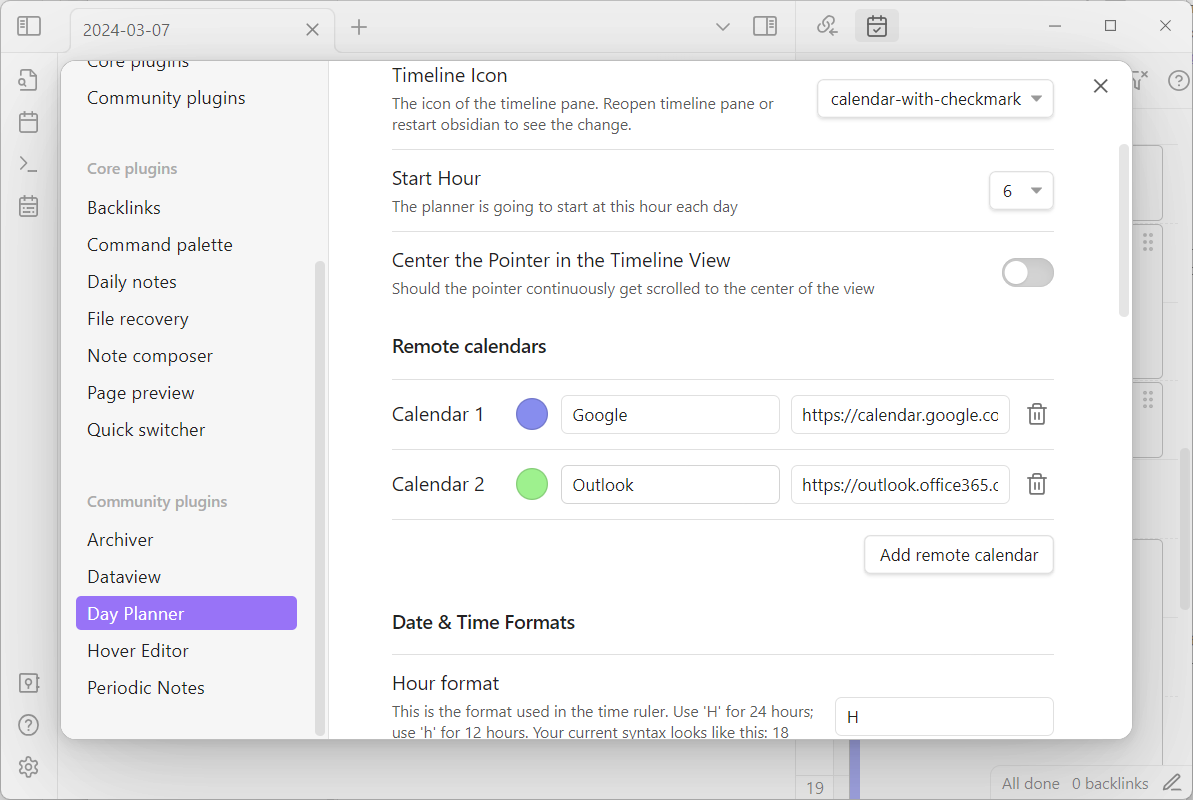
Where to get a Google Calendar link
[!Warning] Make sure you copy the right link! It should end with
.ics, otherwise, you won't see your events!
Where to get an iCloud link
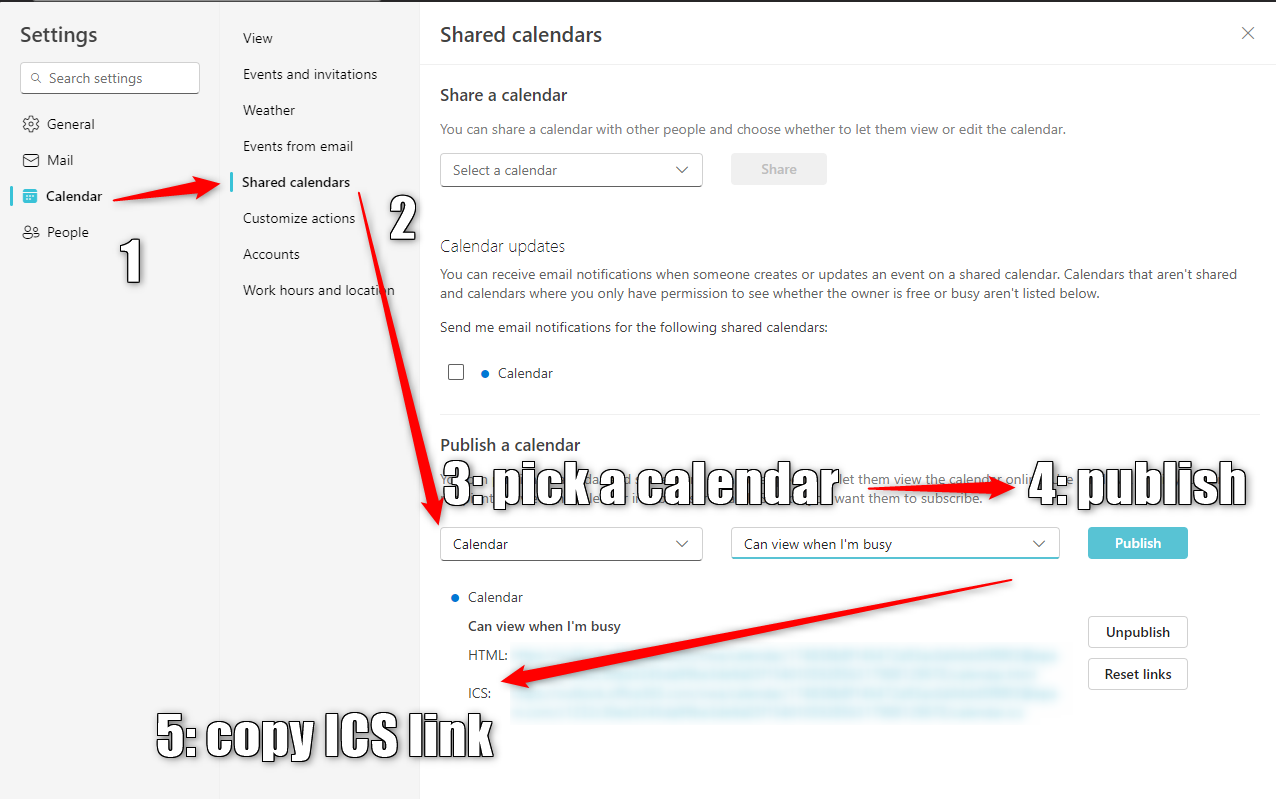
Where to get an Outlook link
Here's the relevant part:
Under the settings in Outlook on the web, go to Calendar > Shared calendars. Choose the calendar you wish to publish and the level of details that you want others to see.
Here's how the settings look on the web version:
Alternative
If your organization doesn't let you share your calendar this way, you might try a different way described in the upstream project.
4. Time tracking
[!Warning] This feature is experimental and can break or change at any time in the near future. You can help to shape this feature by providing your feedback.
You can record time spent on tasks in the form of Dataview properties and then view the records as time blocks, much like planner entries.
Recording clocks
Start a clock by right-clicking on a task in the editor:
Stop the clock to record the time spent on a task or cancel it to discard the record:
There is a command for each of the menu items, available in the command palette or as a hotkey:
Clocks in timelines
You can enable an additional timeline column to see the recorded clocks next to your planner:
Active clocks
You can see the currently active clocks in the timeline sidebar:
A right click on an active clock will bring the control menu:
Limitations
- For now clock time blocks are read-only. This is going to be addressed in the future.
Upstream
Day Planner Enhanced is maintained as an independent fork of Obsidian Day Planner. Upstream changes can still be merged from the original project when useful, but this plugin has its own package identity, release versioning, and issue tracker.
Acknowledgements
- Day Planner Enhanced is based on Obsidian Day Planner.
- Thanks to Michael Brenan for Dataview
- Thanks to James Lynch for the original plugin
- Thanks to Joshua Tazman Reinier for his plugin that served as an inspiration
- Thanks to @liamcain for creating daily note utilities and a helpful calendar plugin
- Thanks to Emacs Org Mode for an idea of text-based time-tracking
- Thanks to Toggl Track for an idea of a great time-tracking UI